Why are my creeping buttercup leaves turning yellow? Common causes and solutions
Nothing is more frustrating than watching your beautiful creeping buttercup plants develop yellowing leaves. As someone who’s dealt with this issue countless times, I can tell you that yellow leaves are your plant’s way of communicating that something isn’t quite right. The good news is that most causes are easily fixable once you understand what’s happening.
Creeping buttercup, or Ranunculus repens, is typically a resilient plant that thrives in various conditions. However, when those vibrant green leaves start turning yellow, it’s time to investigate. Let me walk you through the most common culprits and their solutions.
Before diving into why your creeping buttercup leaves are turning yellow, it’s helpful to understand what makes this plant tick. Creeping buttercup is a low-growing perennial that spreads through runners, creating a nice carpet-like effect in gardens. These plants are incredibly adaptable, but they do have specific preferences that, when unmet, can lead to yellowing foliage.
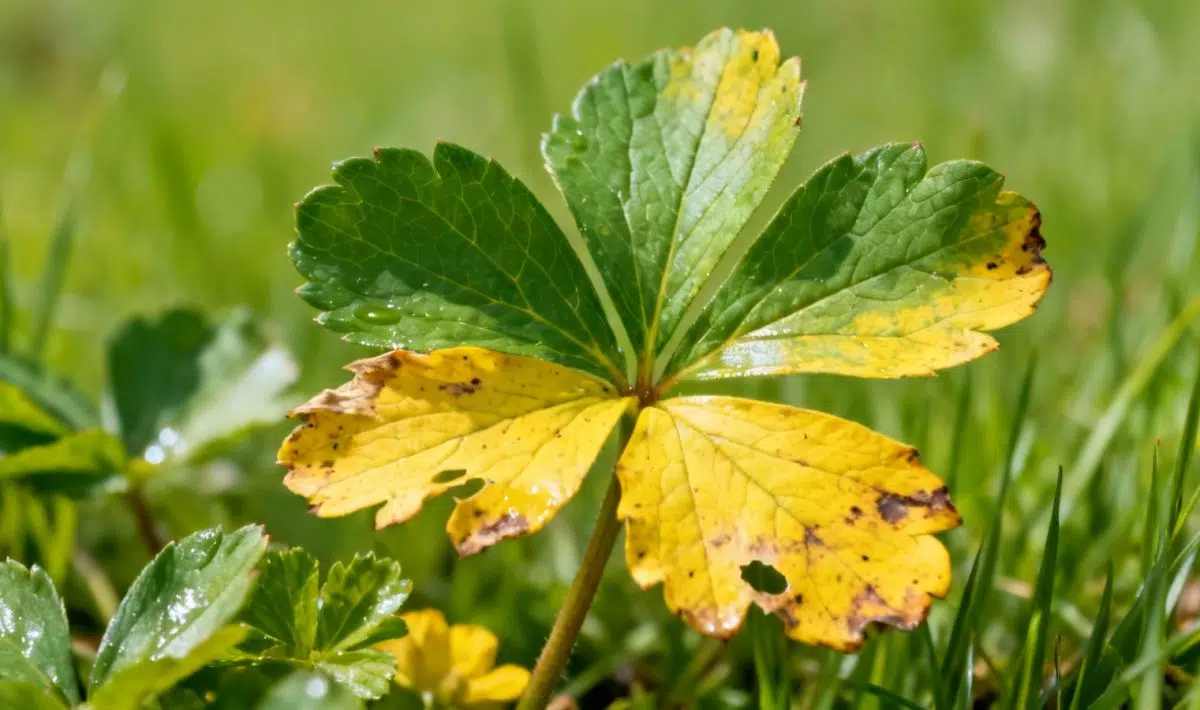
The leaves of creeping buttercup are typically divided into three leaflets with serrated edges. When healthy, they maintain a rich green color throughout the growing season. Any deviation from this vibrant appearance signals that your plant needs attention.
✅ Quick Checklist
Is the soil too wet or too dry?
Is the plant getting 6+ hours of sunlight daily?
Have you fertilized in the last 2 months?
Are there visible pests under the leaves?
Does the pot have adequate drainage?
🔥 FREE
📱
Diagnose your plant in one click!
AI instant diagnosis • Personalized solutions • 50,000+ species
The most common reason for yellowing creeping buttercup leaves is improper watering. These plants prefer consistently moist soil but can’t tolerate waterlogged conditions. When the roots sit in soggy soil for extended periods, they begin to rot, preventing proper nutrient uptake and causing leaves to yellow from the bottom up.
On the flip side, allowing the soil to become bone dry can also stress your plant. Creeping buttercup needs regular water to maintain its lush appearance. During hot summer months, you might need to water daily, while cooler periods require less frequent watering.
To check if water is the culprit, stick your finger about an inch into the soil. It should feel like a wrung-out sponge – moist but not dripping. If it’s either completely dry or soggy, adjust your watering schedule accordingly.
Soil quality and nutrient deficiencies
Poor soil conditions often contribute to yellowing leaves in creeping buttercup plants. These robust plants aren’t particularly fussy about soil type, but they do need decent drainage and adequate nutrition. Heavy clay soils that retain too much water can cause root problems, while sandy soils that drain too quickly may not provide enough moisture.
Nutrient deficiencies, particularly nitrogen deficiency, commonly cause yellowing leaves. When plants lack nitrogen, the older leaves turn yellow first as the plant redirects nutrients to newer growth. This is similar to what you might observe with other plants experiencing similar issues, such as reasons for yellow honeysuckle leaves in garden settings.
Adding compost or a balanced fertilizer can help restore nutrient levels. I recommend feeding your creeping buttercup with a diluted liquid fertilizer every 4-6 weeks during the growing season to prevent deficiency-related yellowing.
Environmental stress factors
Environmental conditions play a huge role in leaf health. While creeping buttercup tolerates various light conditions, sudden changes can cause stress. Moving a plant from shade to full sun too quickly often results in yellowing and scorching of leaves.
Temperature fluctuations can also trigger leaf yellowing. These plants prefer moderate temperatures and may struggle during extreme heat waves or unexpected cold snaps. If you’re growing creeping buttercup in containers, consider moving them to a more protected location during harsh weather.
Interestingly, this type of environmental stress isn’t unique to buttercups – many plants show similar symptoms when conditions aren’t ideal, including issues like causes of yellow snake plant leaves in indoor environments.
Common diseases affecting creeping buttercup
Fungal diseases frequently cause yellowing in creeping buttercup plants, especially in humid conditions or when leaves stay wet for extended periods. Crown rot, caused by various soil-borne fungi, attacks the plant’s base and causes leaves to yellow and wilt progressively.
Leaf spot diseases also create yellow patches that eventually turn brown. These typically start as small yellow spots that expand over time. Good air circulation and avoiding overhead watering can help prevent many fungal issues.
If you suspect disease, remove affected leaves immediately and dispose of them away from your garden. Avoid composting diseased plant material, as this can spread pathogens to healthy plants.
✅ Quick Checklist
Is the soil too wet or too dry?
Is the plant getting 6+ hours of sunlight daily?
Have you fertilized in the last 2 months?
Are there visible pests under the leaves?
Does the pot have adequate drainage?
🔥 FREE
📱
Diagnose your plant in one click!
AI instant diagnosis • Personalized solutions • 50,000+ species
Now that we’ve identified the main causes, let’s focus on solutions. The key to preventing yellow leaves is creating optimal growing conditions for your creeping buttercup plants. Start by ensuring proper drainage – if you’re growing in containers, make sure they have adequate drainage holes.
Water management is crucial. Check soil moisture regularly and water when the top inch feels dry. During hot weather, your plants may need daily watering, while cooler periods require less frequent irrigation. Always water at the base of the plant rather than overhead to reduce disease risk.
For soil improvement, work compost into heavy clay soils to improve drainage, or add organic matter to sandy soils to help retain moisture. A balanced fertilizer applied monthly during the growing season will keep your plants well-fed and less susceptible to stress-related yellowing.
When to worry and when to wait
Some leaf yellowing is completely normal, especially on older leaves at the bottom of the plant. This natural aging process shouldn’t cause alarm if only a few leaves are affected and the rest of the plant looks healthy.
However, if yellowing spreads rapidly throughout the plant or is accompanied by wilting, black spots, or a foul smell from the soil, immediate action is needed. These symptoms often indicate serious issues like root rot or severe disease that require prompt intervention.
Keep in mind that newly transplanted creeping buttercup plants often experience some yellowing as they adjust to their new environment. Give them a few weeks to settle in before assuming something is wrong.
Remember, healthy plants are always better equipped to resist problems. By providing consistent care – proper watering, good soil, adequate light, and regular feeding – you’ll minimize the chances of seeing those dreaded yellow leaves on your creeping buttercup plants.
Allan is a lifelong gardening enthusiast who still gets excited when the first seedlings pop up in spring. With a deep love for nature and a hands-in-the-soil approach, he shares practical tips, plant discoveries, and clever tricks picked up over years of digging, planting, and observing. Whether you’re a new gardener or have a shed full of tools, Allan writes like a neighbor who’s always happy to swap cuttings and stories over the fence.
You can find more about Allan’s work on Malt or connect with him on LinkedIn.