Moth orchid phalaenopsis amabilis care and propagation techniques
The Phalaenopsis amabilis, commonly known as the moth orchid, stands as one of the most beloved houseplants for both beginners and experienced gardeners. This elegant orchid species brings a touch of tropical sophistication to any home with its graceful white flowers and remarkable adaptability to indoor conditions.
Understanding the moth orchid – Phalaenopsis amabilis characteristics
Native to the humid tropical regions of Southeast Asia, this stunning orchid produces magnificent white flowers that can bloom for up to four months when properly cared for. The thick, leathery leaves store moisture efficiently, while the distinctive aerial roots help absorb humidity from the surrounding air. These characteristics make it surprisingly resilient compared to other orchid varieties.
The flowers typically appear in elegant sprays during the winter months, creating a spectacular display that can brighten even the darkest days. Each bloom features delicate petals with subtle yellow markings that add to their natural beauty. The plant’s compact growth habit makes it perfect for windowsills, coffee tables, or any bright spot in your home.
What sets this orchid apart is its ability to rebloom year after year with minimal effort. Unlike many flowering plants that require complex care routines, the Phalaenopsis amabilis rewards patient gardeners with consistent blooming cycles. Just as you might care for oleander plants effectively, this orchid benefits from understanding its natural growing conditions.
Essential watering and humidity requirements
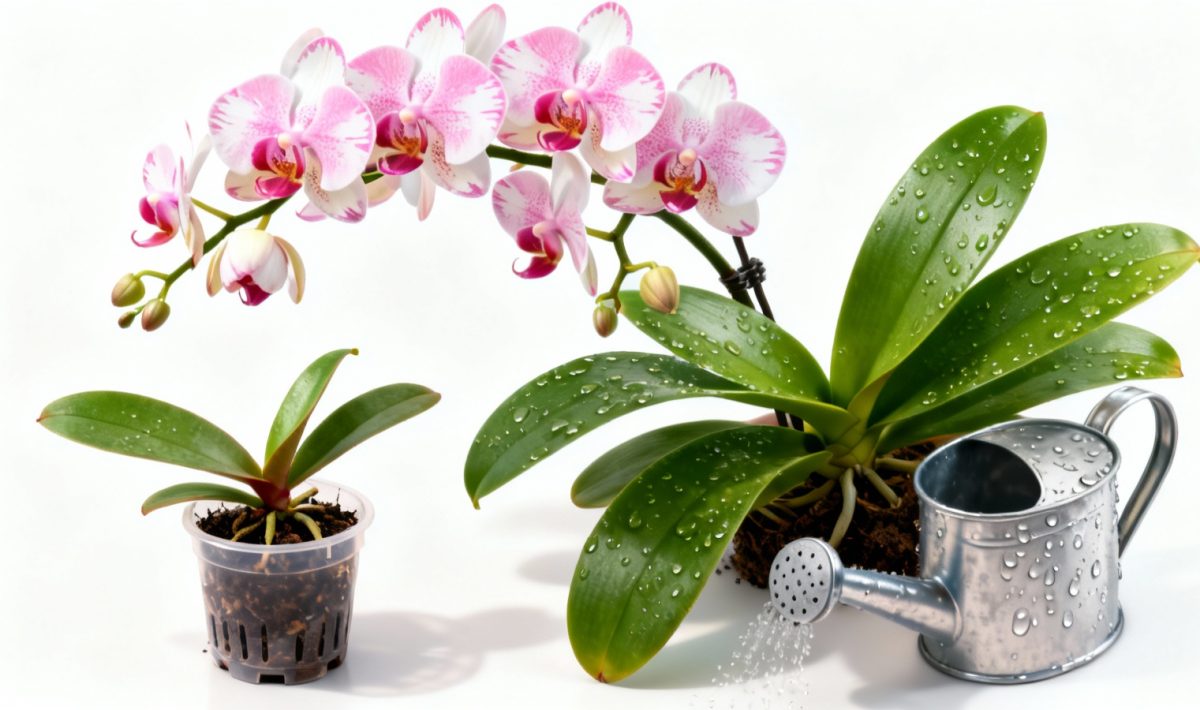
Proper watering forms the foundation of successful orchid care. These plants prefer a thorough soaking followed by a complete drying period, mimicking their natural epiphytic growing conditions. Water your orchid approximately once a week, allowing the potting medium to dry out between waterings.
The ice cube method, while popular, can shock the roots with cold temperatures. Instead, use room temperature water and pour it slowly around the base until it drains freely from the bottom holes. This ensures the roots receive adequate moisture without becoming waterlogged.
Humidity plays a crucial role in maintaining healthy growth. Aim for 50-70% relative humidity around your plant. You can achieve this by placing the pot on a humidity tray filled with pebbles and water, or by grouping several plants together. Regular misting of the air around the plant also helps, but avoid getting water directly on the leaves or flowers.
Light conditions and temperature management
Phalaenopsis orchids thrive in bright, filtered light similar to what they receive under the forest canopy in their natural habitat. An east-facing window provides ideal morning sunlight without the intense afternoon heat that can scorch the leaves. North-facing windows work well too, while south and west exposures may require sheer curtains to diffuse the light.
Temperature consistency matters more than extreme ranges. These orchids prefer daytime temperatures between 70-80°F (21-27°C) and nighttime temperatures around 60-65°F (15-18°C). This slight temperature drop at night actually encourages blooming, so avoid placing your orchid near heating vents or radiators that might eliminate this natural fluctuation.
Air circulation helps prevent fungal issues and strengthens the plant overall. A small fan on low speed, positioned to create gentle air movement without direct drafts, can significantly improve your orchid’s health. Much like when you learn how to grow cucumbers, proper air flow prevents many common plant problems.
Fertilization and feeding schedule
Orchids require regular but diluted feeding to maintain their health and blooming capacity. Use a balanced orchid fertilizer (such as 20-20-20) diluted to quarter strength every two weeks during the growing season. The popular saying “weakly, weekly” applies perfectly here – light, frequent feeding works better than occasional heavy applications.
During the blooming period, you can switch to a phosphorus-rich fertilizer to support flower development. However, never fertilize a completely dry plant, as this can burn the sensitive roots. Always water lightly before applying fertilizer, then follow with a thorough watering to distribute the nutrients evenly.
Flush the potting medium with plain water once a month to prevent salt buildup from fertilizers. This simple step helps maintain healthy root systems and prevents the leaf tip burn that often indicates nutrient accumulation.
Repotting techniques and timing
Repotting becomes necessary every 1-2 years when the potting medium begins to break down or the plant outgrows its container. Fresh bark-based orchid mix provides better drainage and aeration than decomposed medium, which can lead to root rot.
The best time for repotting is immediately after flowering, when the plant enters its active growth phase. Carefully remove the old medium and inspect the roots, trimming away any that appear brown, mushy, or dried out. Healthy roots should be firm and white or green.
Choose a pot only slightly larger than the root system – orchids prefer being slightly root-bound. Plastic pots with multiple drainage holes work well, though some growers prefer clear pots that allow monitoring of root health. Position the plant so the newest growth points toward the center of the pot, leaving room for expansion.
Propagation methods for expanding your collection
Phalaenopsis orchids can be propagated through several methods, with keiki (baby plants) being the most common natural occurrence. These small plantlets sometimes develop along the flower stem or at the base of the mother plant. When a keiki develops its own roots about 2-3 inches long, it can be carefully separated and potted independently.
Division works for mature plants that have developed multiple growing points. This method requires careful separation of the root system, ensuring each division has adequate roots and at least one growing point. Sterilize all cutting tools to prevent disease transmission.
For those interested in advanced techniques, tissue culture propagation offers the potential for numerous identical plants, though this method requires specialized equipment and sterile conditions. Most home gardeners find success with the simpler keiki method. Just as you might explore tips for caring for Philodendron Birkin, patience proves essential in orchid propagation.
Common challenges and troubleshooting
Yellowing leaves often indicate watering issues – either too much or too little. Lower leaves naturally yellow and drop as the plant ages, but multiple yellowing leaves suggest a problem. Check your watering schedule and ensure proper drainage to address this concern.
Failure to bloom usually results from insufficient light or lack of temperature variation between day and night. Moving your orchid to a brighter location or ensuring cooler nighttime temperatures often resolves blooming issues. Some orchids also need a rest period after flowering before they’ll bloom again.
Root problems typically stem from overwatering or old, decomposed potting medium. If you notice mushy, brown roots, immediate repotting with fresh medium becomes essential. Remove all damaged roots and allow the plant to dry slightly before resuming normal care.
Pest issues, while less common, can include scale insects, mealybugs, or spider mites. Regular inspection of leaves and stems helps catch problems early. Isopropyl alcohol on a cotton swab effectively removes small infestations, while horticultural soap sprays work for larger problems. Similar vigilance applies when you how to care for Monstera obliqua, as prevention always proves easier than treatment.
Encouraging reblooming and long-term care
After the flowers fade, resist the urge to cut the flower stem immediately. Sometimes secondary flower spikes develop from nodes along the original stem, extending the blooming period. Only cut the stem when it turns completely brown or begins to shrivel.
To encourage future blooming, provide your orchid with a slight stress period by reducing watering frequency and allowing cooler nighttime temperatures for 4-6 weeks. This mimics the dry season in their native habitat and triggers the hormonal changes necessary for flower spike development.
Consistent care throughout the year builds strong, healthy plants capable of producing spectacular flower displays. Regular monitoring of growth patterns helps you understand your particular plant’s preferences and adjust care accordingly. Much like understanding southern magnolia care, developing a relationship with your orchid takes time and observation.
The moth orchid’s reputation for being difficult to grow proves largely undeserved when you understand its basic needs. With proper attention to watering, light, and temperature, these remarkable plants reward gardeners with years of elegant blooms and the satisfaction of successfully cultivating one of nature’s most sophisticated flowering plants. Whether you’re starting with your first orchid or expanding an existing collection, the Phalaenopsis amabilis offers an ideal combination of beauty, resilience, and rewarding cultivation that makes every blooming cycle a celebration of successful gardening.
Allan is a lifelong gardening enthusiast who still gets excited when the first seedlings pop up in spring. With a deep love for nature and a hands-in-the-soil approach, he shares practical tips, plant discoveries, and clever tricks picked up over years of digging, planting, and observing. Whether you’re a new gardener or have a shed full of tools, Allan writes like a neighbor who’s always happy to swap cuttings and stories over the fence.
You can find more about Allan’s work on Malt or connect with him on LinkedIn.